
WARNING: RAZORS ARE EXTREMELY SHARP. MISUSE CAN CAUSE SERIOUS INJURY! SHOULD YOU ATTEMPT ANY OF THE TASKS DESCRIBED IN THIS ARTICLE, YOU DO SO AT YOUR OWN RISK.
Any informed discussion about honing has to begin by saying: there isn't just one way to make a razor sharp. The ultimate test of any honing method is the act of shaving, and judging how well the blade removes hair and feels against the skin. If it cuts hair and doesn't ruin your face, then it works. How well it works depends on an infinite number of factors that may have nothing or everything to do with honing, from the quality of the steel to whether or not you drank coffee with or without sugar this morning.
Part II of this series will discuss discerning when to hone, choosing your first hone, lapping the hone, examining the razor, and setting up your honing station. Finally, we will cover the basic technique for honing a razor: the X-pattern honing stroke.
When to Hone
You've noticed lately that you don't enjoy shaving. It seems harder than it was last week, the results aren't as good, and your face is red and puffy afterwards no matter how much lotion you use. You've been diligent about practicing your stropping, even posted videos to the forums for veteran shavers to critique. Your shaves were going so well a while back, almost getting that baby-butt smoothness. But now your results are patchy, at best. Well, chances are your razor is dull or damaged and honing is already way overdue.
A more likely scenario is that you've put your razor through its paces for a few months and the edge has been knocked down beyond what normal stropping can restore. If you really want to put off honing, you can try pasting your strop, but only if you're confident that your technique is up to snuff. Eventually the razor will need to be honed, and you can either fork out the money to have someone else do it, or you can buy yourself a good hone and invest some time in a new skill set.
Assuming you have chosen the latter option, here is what you'll need to get started:
The Hone
Which hone should you use? A quick google search will yield a lot of suggestions, and a dive into the forums will yield even more. Belgian Blues, coticule stones, natural stones, resin stones, ceramic stones... You get the idea. One hone which is affordable, consistent, and comes highly recommended is the Norton 4k/8k waterstone. It's a great for anyone wanting the simplicity of a one-stone system: the 4k side is abrasive enough to work out minor nicks and scratches, and the 8k is fine enough to produce a shave-ready edge. We use this hone in our manufacturing process and it does a great job at refreshing razors after prolonged use. One drawback of the Norton 4k/8k is that it must be lapped before its first use, as the surface finish from the factory is too abrasive and not consistent with the rest of the stone.
If you want to tackle a more seriously damaged razor, a more aggressive hone like the 1k Naniwa Professional (formerly Chosera), or even a coarse DMT diamond stone will likely be necessary. The advantage of the DMT stone is that the hone's base is precision-ground and guaranteed to be perfectly flat, and does double duty as a great lapping stone.
In general, you want to remove the least amount of material possible, and so you'll want to start honing with the finest stone that will yield the desired result. Starting on a coarser stone will remove material faster, but too coarse a stone will leave deep hone lines on the bevel which will have to be smoothed out on finer stones. Starting on a finer hone removes material more evenly, but one which is too fine will take much longer and wear out the hone. Better to start on too fine a hone and realize you need a more abrasive one, than to start on too coarse a stone and realize you've removed too much material.
Lapping The Hone
Your hone should be flat and clean of debris before you start honing. This doesn't have to be done before every session, but after multiple honings the tiny pores in the stone will start to fill with swarf--fine pieces of metal and stone--which reduces the stone's abrasive quality. Lapping clears swarf and levels the stone by exposing fresh material. This does reduce the thickness of the stone over time, but this is a less pressing issue than a dull razor.
- To lap your hone, hold it in one hand with the lapping stone facing it in the other.
- Under running water, press the stones firmly together and rub them back and forth so that the whole surface of the hone is worked by the lapping stone.
- Continue until fresh material is exposed on the hone's entire surface.
- You may also choose to chamfer the corners of your stone.. You do this by placing the edges of the hone perpendicular to the lapping stone and rubbing them together, creating a 45 degree angle in relation to the hone's surface. This is to reduce the consequences of some common mistakes, like applying too much pressure to the heel as it passes off the stone.
Once your stone is flat and clean, it is time to address the blade itself.
Examining the Straight Razor
- Determine the shape of your razor.
- Razors that are straight are the easiest to hone, and require no special considerations.
- A "smiling" razor, one whose edge projects outwards in the middle, will have to be honed in a rocking heel-to-toe pattern, taking care not to wear out the middle of the blade.
- A "frowning" razor whose edge is concave has been over-honed and is damaged. Honing this will require some more involved restoration for it to be effective.
- A blade which is bent or curved to the side is quite common, especially with vintage razors with an extreme hollow grind. Steel fatigues over time and can warp, but the degree of warping will determine whether or not the blade can be honed. If the blade is bent sharply, it is likely useless.
- Look for any visible signs of wear on the blade. Imperfections will show up as reflections under a light. More obvious examples include chips, grooves, and scratches on the bevel's edge and flat surface, all of which cause irritation.
- Rust is an issue that deserves it's own article. Light oxidation can be wiped away with a clean cloth, and a little oil will help remove and prevent further rust. Rust which has penetrated the razor's surface can be a serious problem, especially once it has worked its way to the cutting edge or has rusted through the whole thickness of the blade, which can render your razor useless.
- Examine the width of the bevel. An even bevel is a sign of a well-ground and well-honed razor. A bevel that is wider at the toe and heel may indicate improper honing: it is quite common to apply too much pressure on either end of the razor, causing it to deflect and flatten on the stone. This can cause your blade to wear unevenly, and may eventually cause the blade to "smile," or curve.
- Does your razor require tape for honing? We hone our razors with one piece of Super 88 on the spine to set the proper bevel angle. Taping protects the spine from wear and elevates it off the hone to manipulate the angle. However, after honing over several years, the blade width will have narrowed and the tape should be removed. Over time, hone wear will start to affect the spine at the same rate as the cutting edge, which helps maintain the proper angle. UPDATE 10/23/2017: due to production changes, we now hone all of our production razors without tape.
Setup
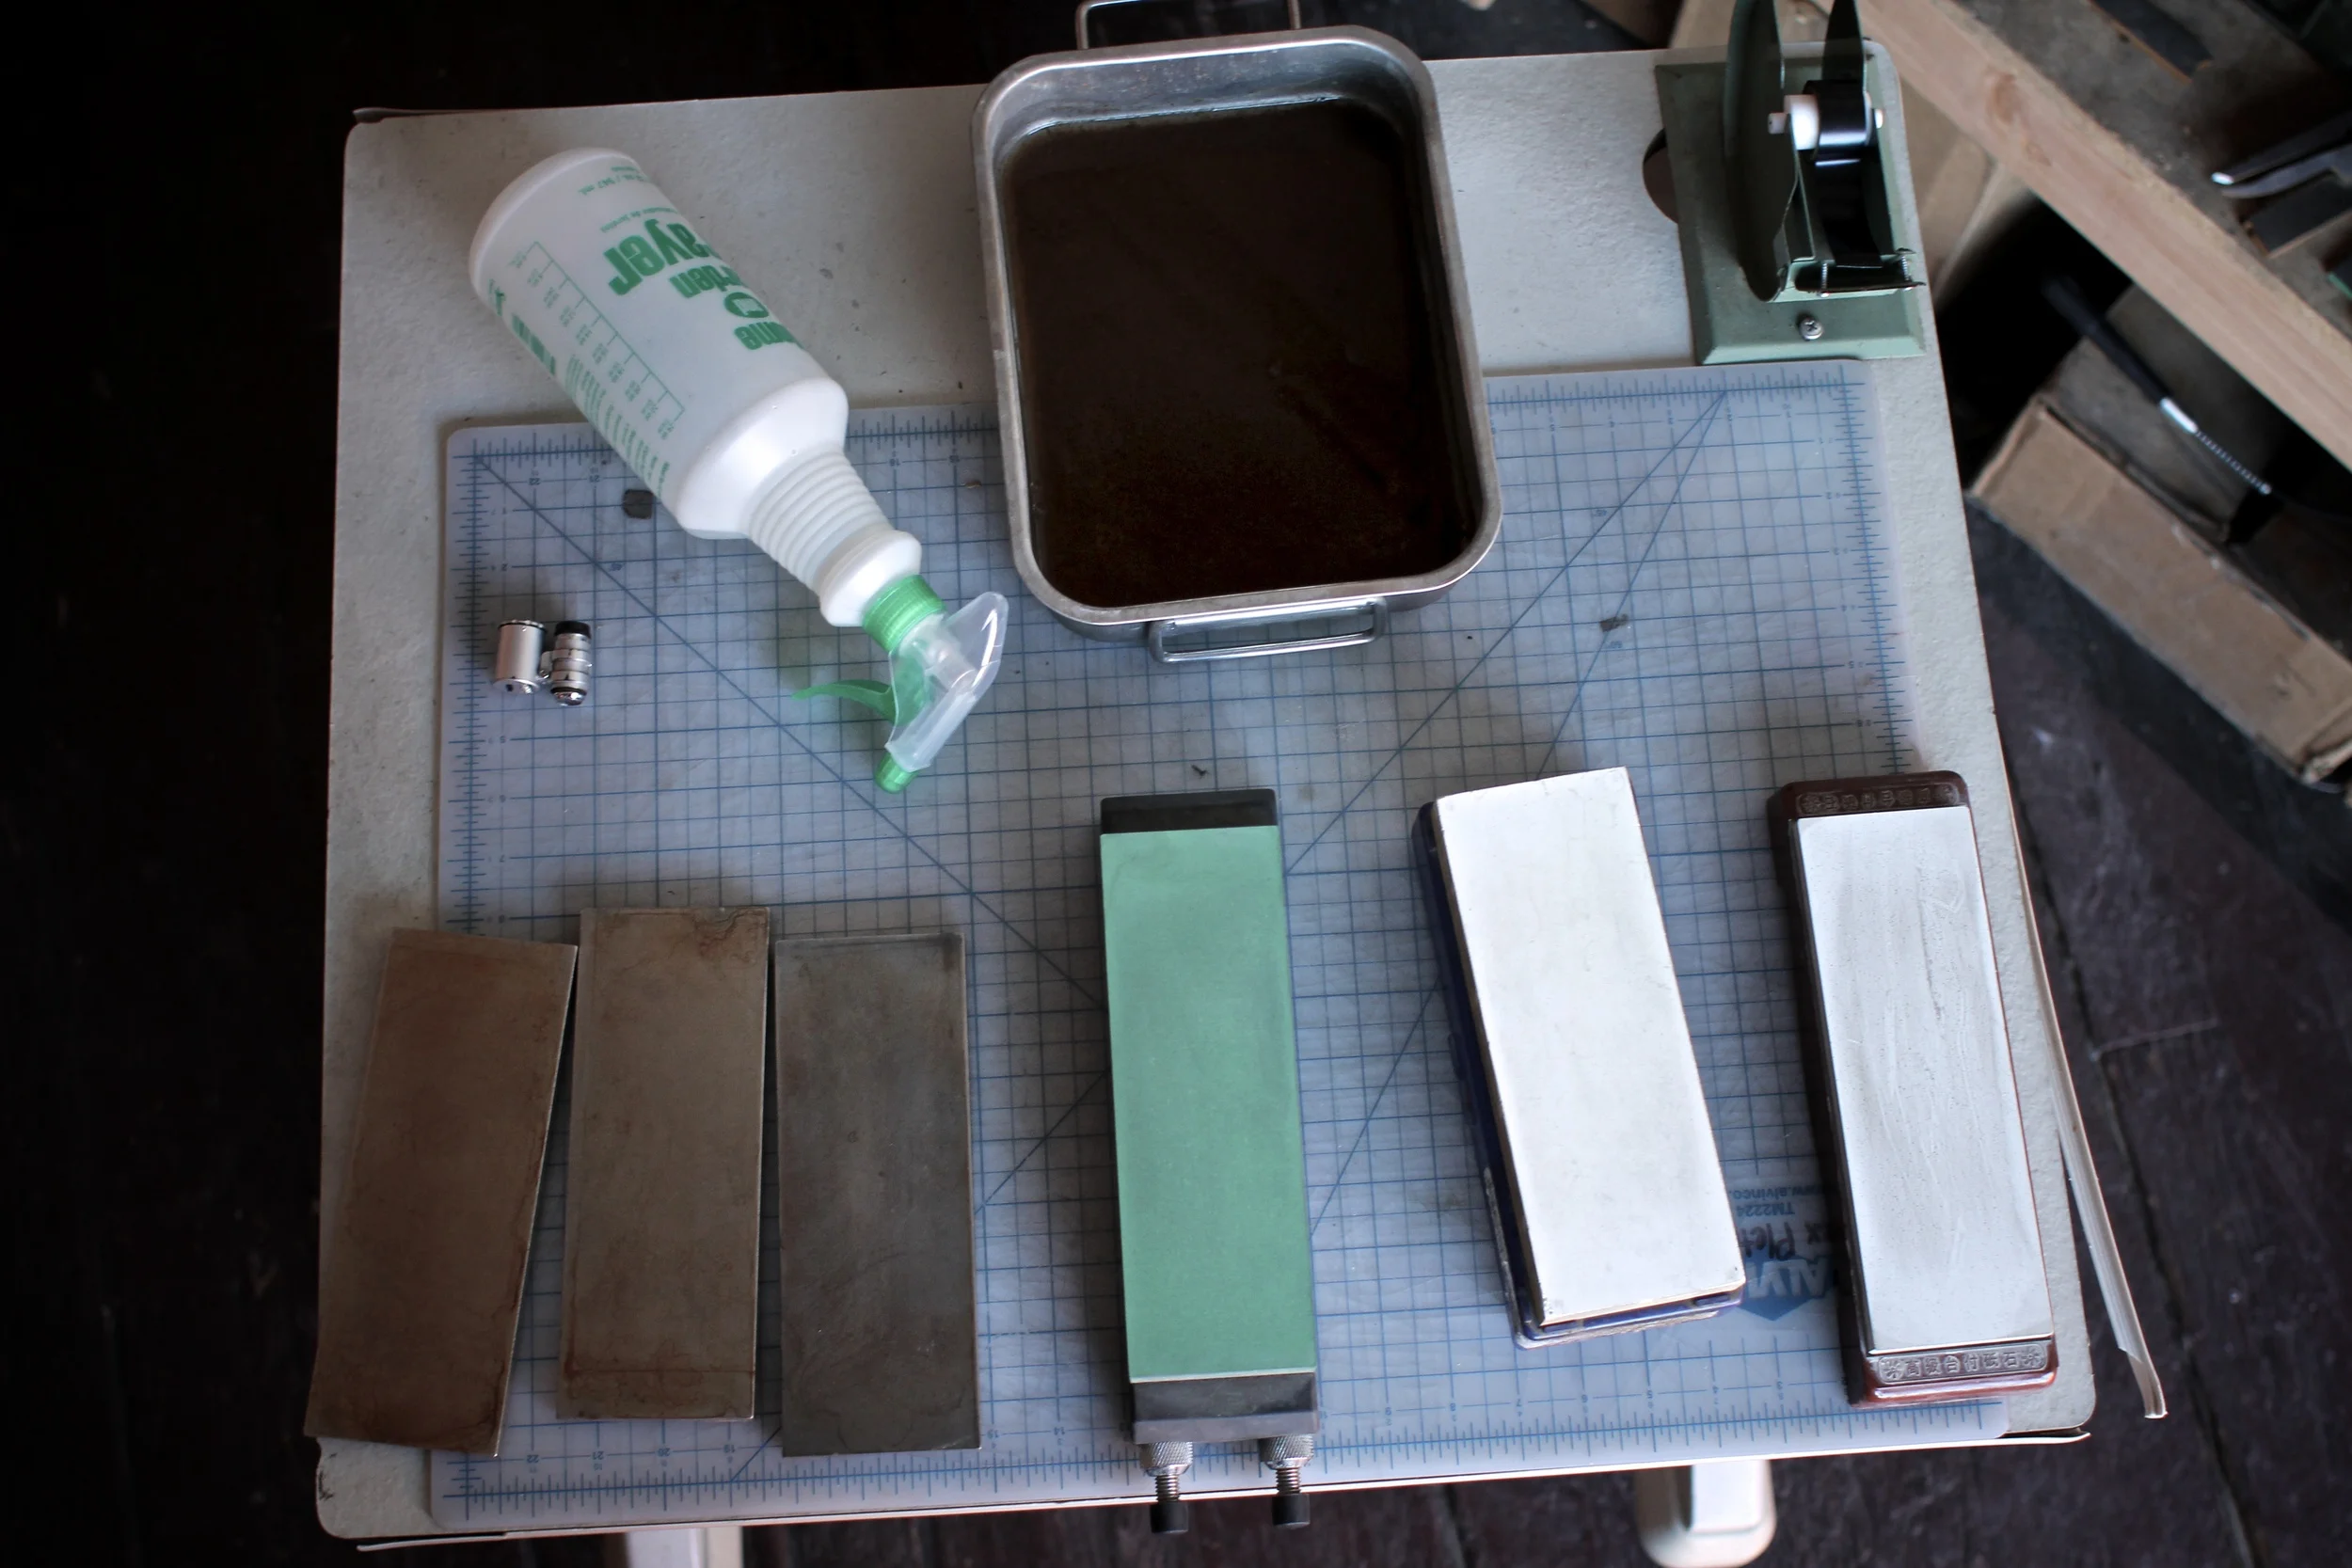
The honing station at Portland Razor Co. HQ
- You'd be amazed how hard metal dust is to get rid of. While the kitchen table may seem like a great candidate, think twice, or at least cover it with a towel.
- You will need a source of clean water to lubricate the hone, so a sink, pan, or spray bottle should be kept handy.
- Have a safe place to set the razor while you move your stones around and ensure that there's nothing to bump into while you work.
- A clean cloth can be used to wipe the razor, but be particularly careful not to cut yourself or mar the blade's surface with metal dust in the cloth. Soft T-shirt material works well.
- Have a system to clean or lap your stones with running water, as metal dust will build up in a slurry (swarf) on your stones if you are setting new bevels or doing a lot of honing.
Honing
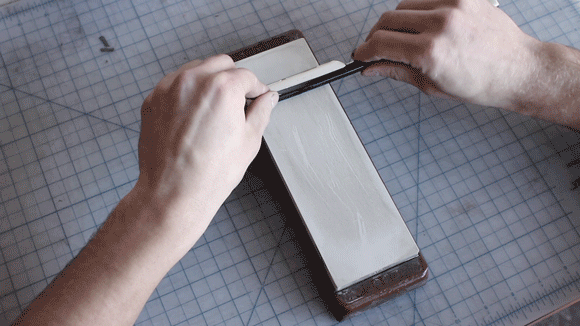
Sharpening a straight razor using X-pattern honing strokes.
DO NOT:
- Cut yourself handling the razor!
- Cut off your fingertips because you put them on the hone!
- Lift the spine off the stone EXCEPT while setting a new bevel.
- Apply pressure to either end of the blade as it comes off the stone; this will create a groove in the bevel where it passes over the edge.
- Use too much pressure; the blade can deflect and flatten onto the stone. This is especially true of razors with a half or full-hollow grind.
- Flip over the blade edge when changing direction.
DO:
- Start with light pressure, increasing as you get more comfortable honing and get to know the razor you're working on.
- Flip over the spine, even leaving it on the stone.
- Lead with the edge of the blade as it travels across the hone, spine trailing.
- Use the thumb and forefinger of both hands to hold either end of the blade.
- Apply a small amount of torque so that there is greater pressure on the edge than on the spine.
- Go slowly; the only time I have cut myself badly was while honing a razor.
- Be intentional. Every pass across the hone is an opportunity to learn something about the characteristics of your stone, the razor, your fingers; to learn their unique textures, sounds, and smells.
The X-pattern Honing Stroke.. For a demonstration of the honing stroke, refer to the .GIF animation above.
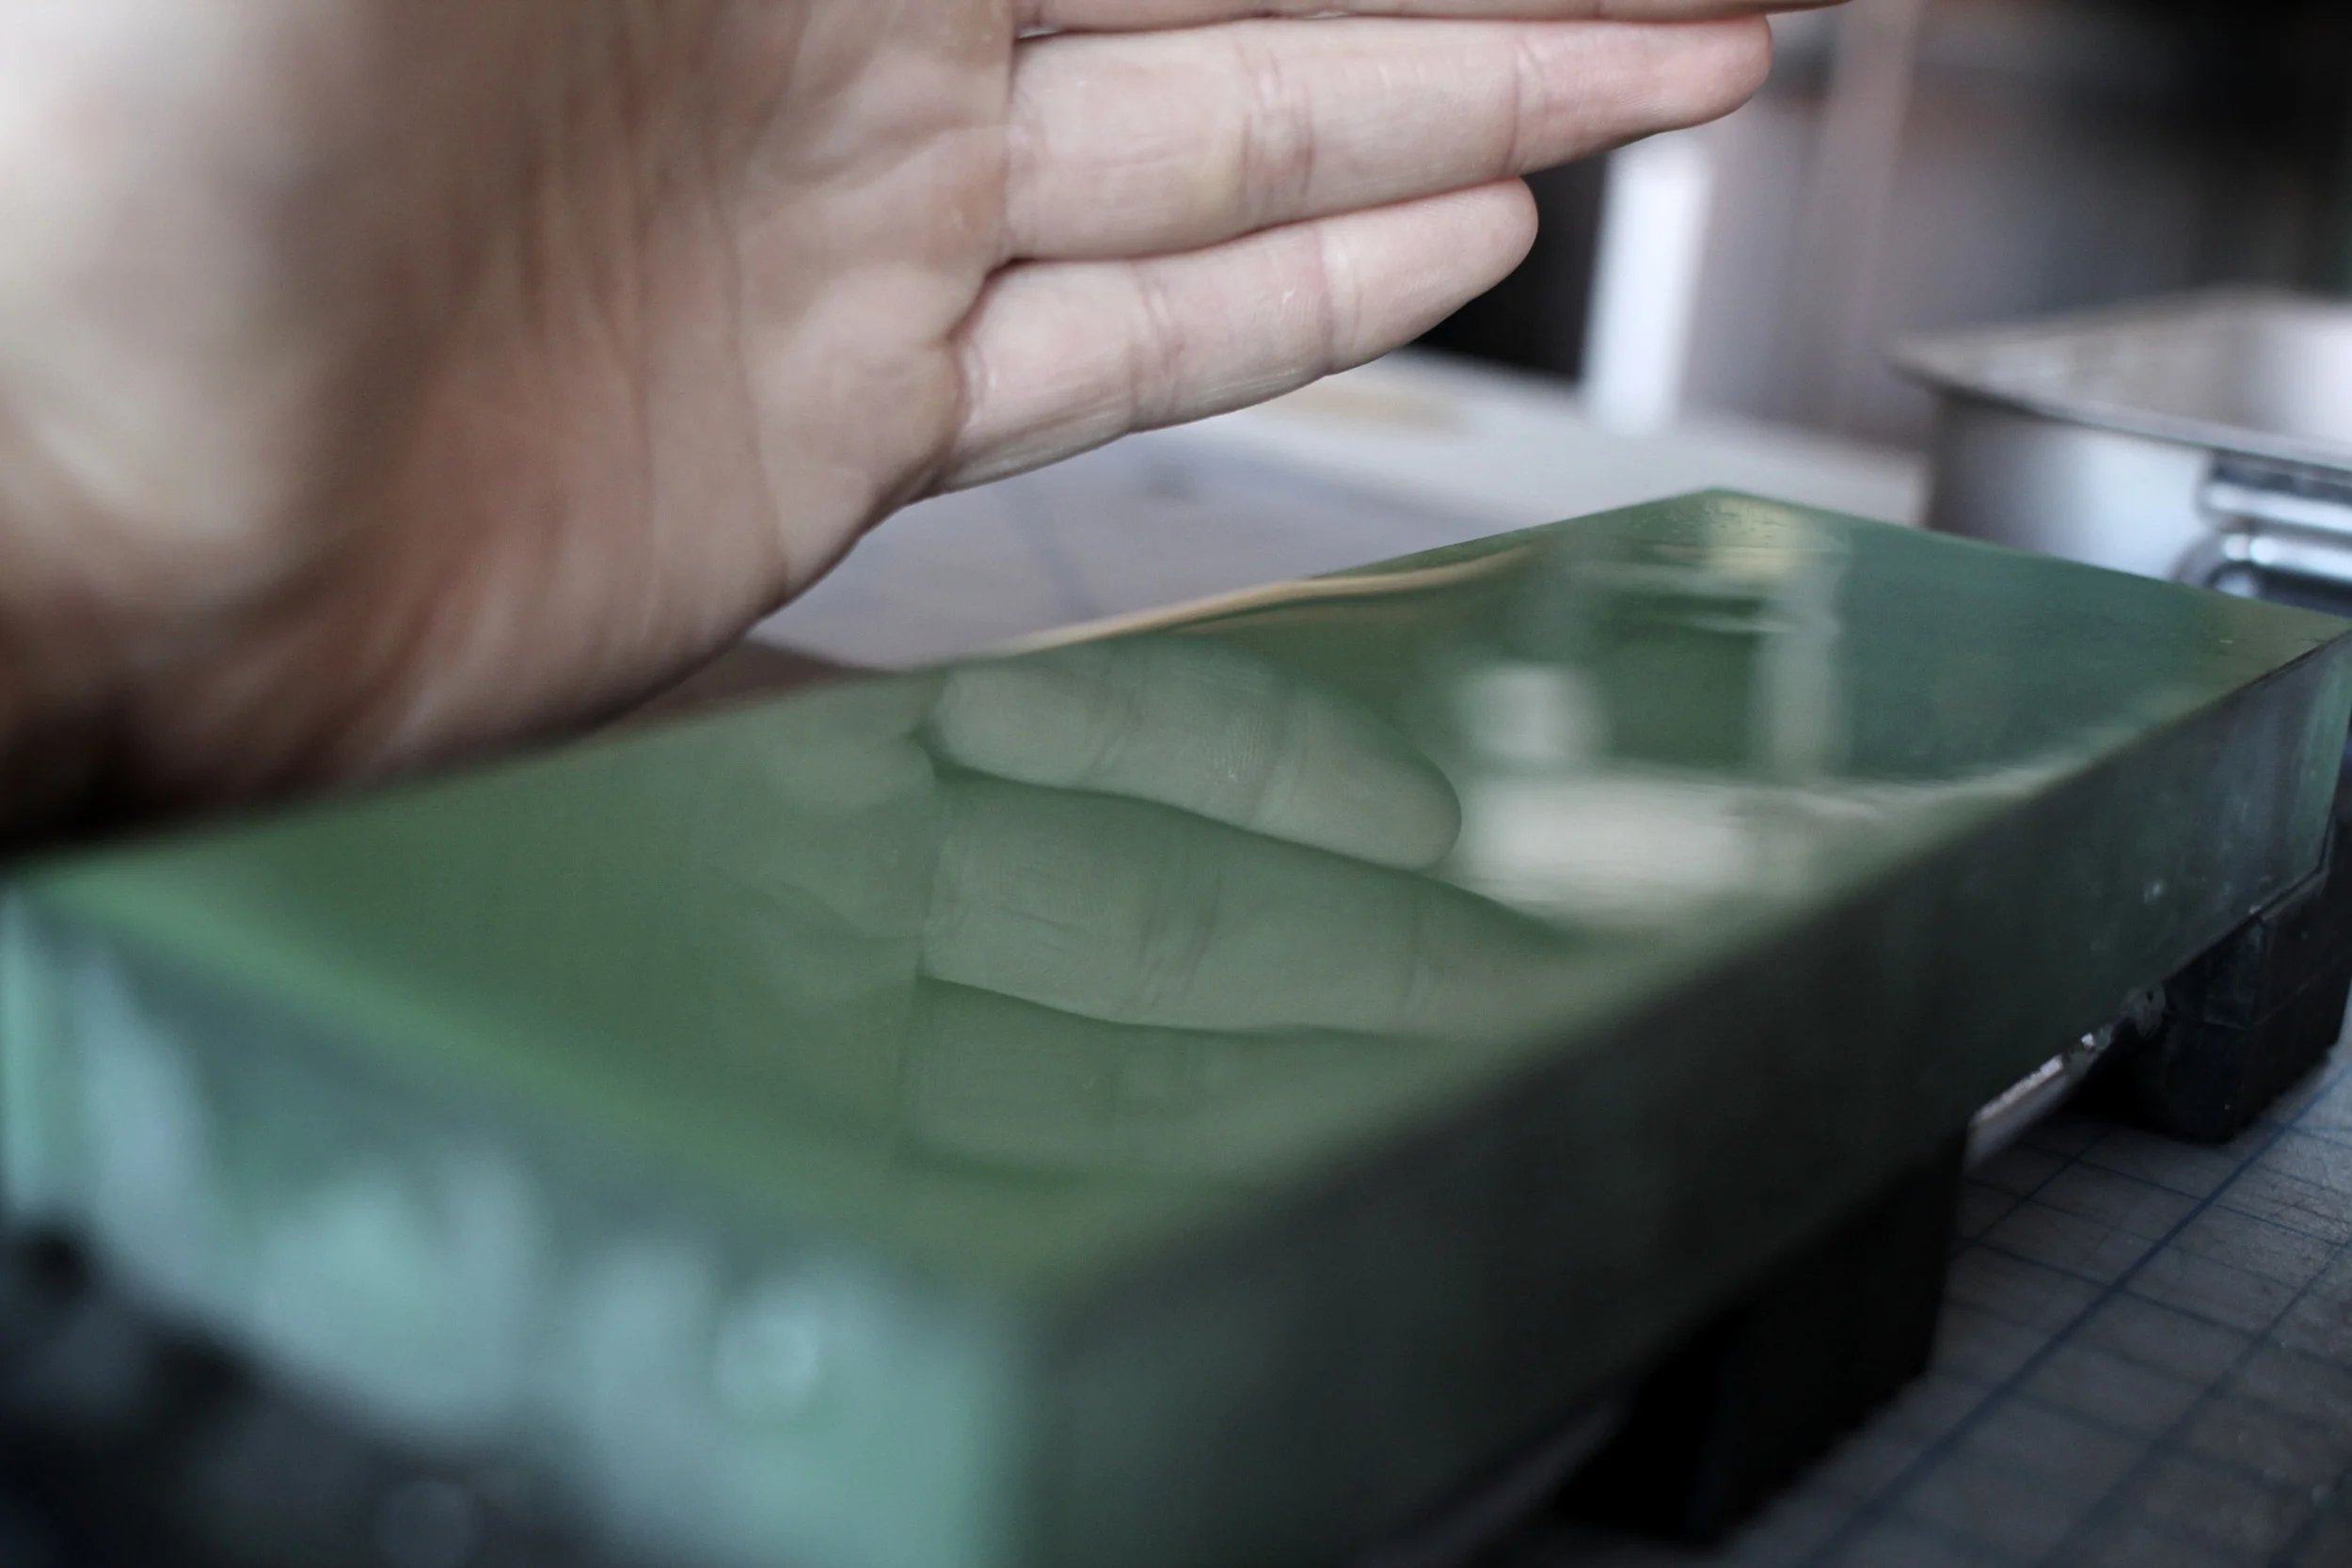
Keep your hone well-lubricated with water, wetting from a pan or spray bottle.
- Lubricate the hone with water; it's surface should be reflective and glassy.
- Place the razor flat on the hone, spine and bevel both in contact.
- With the edge leading, push the blade away from you and at a slight diagonal across the hone so that the whole blade passes over the hone.
- Stop short of the end of the hone, flipping it over its spine and NOT the edge.
- Pull the blade towards you at a slight diagonal.
- Flip the blade over its spine.
- Repeat until the blade's edge is even and gives off no reflections under a flashlight and the bevel has an even finish. For a routine touch-up, this may take as few as 10 passes on each stone. Check your work frequently.
- Move on to a finer hone and repeat steps 1-7.
In Part III of this series, you'll learn about one of the last steps in our manufacturing process: how we set the bevel on a new razor, including our full hone progression, with tips and tricks to help improve your own honing.